In this post I will share our experience in the last year, where we had a small project to make land prediction value from crowdsource data mainly from online advertisement. One of the steps in the project was to do geocoding from an address in the advertisement to get a coordinate on the earth. If you follow this blog, in the previous post I had discussed how to do geocoding and also reverse geocoding for free in QGIS using Nominatim Service. So why did I wrote a post with the same topics but using ArcGIS service? That's because we found out that Nominatim service does not produce a good result and frequently produces empty result for areas in our project. Then we proposed using Google Geocoding API service, but for some reason our partner refused it. Finally we end up with ArcGIS API.
Getting ArcGIS API Key
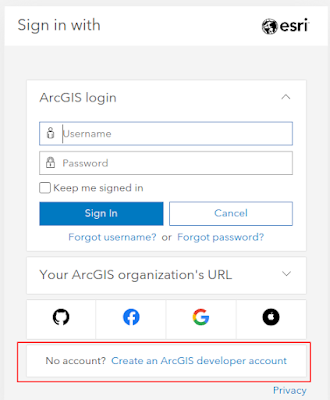
To use ArcGIS service we have to make an ArcGIS developer account from
https://developers.arcgis.com/. After opening the page, go to Sign in. You will get a page
like figure 1. If you don't have any account then create a new one.

|
|
Figure 1. Create ArcGIS Developer Account |
This is what will you get from the ArcGIS service platform:
- 2,000,000 map tiles per month
- 20,000 geocode searches (not stored) per month
- 20,000 simple routes per month
- 5,000 service areas per month
- 5 GB tile and data storage
- 100 MB feature service storage
Although with limited requests, 20.000 geocode searches a month is enough for our small project :).
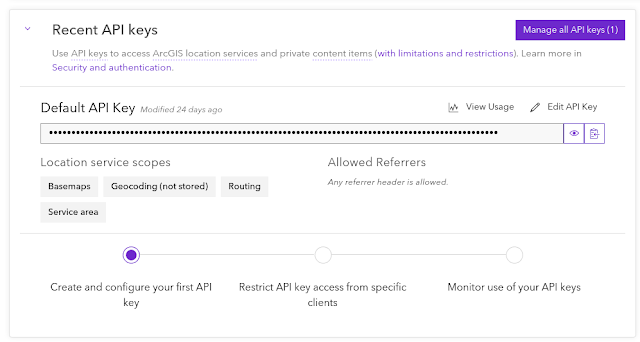
Next after signing in, you will get an API Key as shown in figure 2.

|
|
Figure 2. ArcGIS API Key |
Geocoding in Python
After getting the API Key, now let's move to Python. To do the geocoding in Python we are using the Geocoder library. The library can be installed using PIP from the terminal/command prompt with this command: pip install geocoder as shown in figure 3.

|
|
Figure 3. Installing Geocoder Library using PIP |
For this tutorial I used a list of property address in Lagos, Nigeria that can be found from Kaggle. Figure 4 is the snapshot of the data.

|
|
Figure 4. Address Data |
Now let's geocode the address. The code below is used to do the geocoding process. The comment in the code is self explanatory. But let me explain it.
Firstly in the line 2-4 all required libraries are imported, there
are: pandas, geocoder and os. We use Pandas to read and write the data.
Geocoder as you already know will be used to do geocoding. OS module
is used to join the path and filename (Anyway you can skip importing
os module and combine the path and filename into one variable).
1 2 3 4 5 6 7 8 9 10 11 12 13 14 15 16 17 18 19 20 21 22 23 24 25 26 27 28 |
#IMPORT LIBRARIES import pandas as pd import geocoder import os #DATA PATH AND FILENAME data_path='/home/ideageo/Downloads' file_name='rent.csv' file=os.path.join(data_path,file_name) #READ DATA WITH PANDAS df=pd.read_csv(file) address=list(df.Address+', Nigeria') #GEOCODING LOOP for i in df.index[0:]: #GEOCODING gc=geocoder.arcgis(address[i],key='PASTE YOUR KEY HERE!') #GET LATITUDE AND LONGITUDE df.at[i,'lat_gc']=gc.lat df.at[i,'lon_gc']=gc.lng print(i,': ',gc.lat,gc.lng) print(address[i]) #PRINT ADDRESS DATA print(gc) #PRINT GEOCODED ADDRESS #SAVE COORDINATE TO FILE df.to_csv(file) |
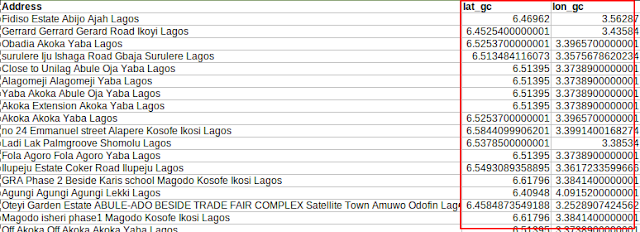
After opening and reading data using Pandas. The geocoding process is starting at line 16. The process is in a loop that takes each address in the list. The latitude and longitude of the address are defined with geocoder lat and lng methods as seen in line 21-22. Then the result is stored in the file with lat_gc and lon_gc column names. To see the result while looping, I used three print commands for showing geocoded latitude and longitude, print address from the data and geocoded address data. I used address data and geocoded address data somehow to quickly measure the quality of geocoding result, by comparing both of them. Lastly in line 28 all the results will be saved into the file.
After running the code, two new columns which were previously mentioned (lat_gc, lon_gc), will be added to the input csv data as shown in the snapshot in the figure 5.

|
|
Figure 5. ArcGIS Geocoding Result |
Plotting Geocoding Result
To see the result spatially, let's add it into QGIS map with the following steps.
-
Add a basemap like OpenStreetMap. You can add it using a simple
Tile+
plugin.
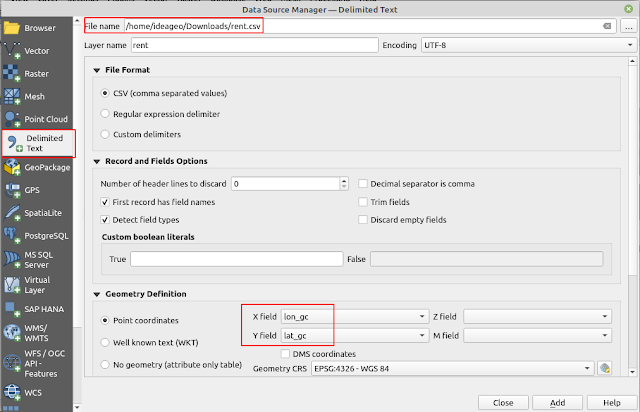
- Click the Open Data Source Manager. The Data Source Manager window will appear as in figure 6. Click Delimited Text on the left panel. Then Browse the gecocoding file. Make sure the file format is CSV.
- Next in the X field and Y field option, choose the corresponding column name, lon_gc and lat_gc.
-
Leave the CRS to the default EPSG:4326 - WGS 84.

|
|
Figure 6. Adding Geocoding Result to QGIS |
The result of gecoded address will be plotted on the map as seen in the figure
7.

|
|
Figure 7. Geocoding Map |
That's all this tutorial on how to do geocoding with ArcGIS and Python. We
learned how to get ArcGIS API key, perform geocoding in Python to get the
coordinates of an address in latitude and longitude and lastly plot it into a
map in QGIS. Hope it is useful and thanks for reading!